
Tips from Janet: Know Your Tools
By Janet Parkhurst
Probably the most important tool decision you make is your glass cutter. There are a lot to choose from. There are two things to consider. What the wheel is made...
$20 Flat Rate Shipping in the Contiguous U.S.
By Janet Parkhurst
Probably the most important tool decision you make is your glass cutter. There are a lot to choose from. There are two things to consider. What the wheel is made...

By Janet Parkhurst
It lubricates the wheel of any glass cutter and keeps it running smoothly. Use of cutting oil on the score line significantly improves the quality of the score and subsequent...
Read more
By Janet Parkhurst
Uroboros 60541 cobalt blue with sky blue, cobalt blue rondels and cobalt blue Dalle glass smashed up! Artist is Jane Burke. Note glass countertop. Spandrel glass! Beautiful. The artist is...
Read more
By Janet Parkhurst
As you become more skilled at soldering you may find that the number you have been setting you temperature control on no longer works the same. Things that affect the...
Read more

By Janet Parkhurst
In addition to there being different types of glass which we talked about in Know Your Glass (part 1) there are also different glass manufacturers. The manufacturers that we stock...
Read more
By Janet Parkhurst
Did you ever have a project that seemed to grow after it was foiled or leaded? A special type of scissor called pattern shears solves this problem. They have three...
Read more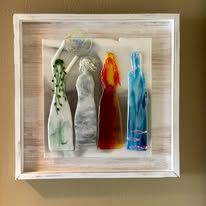
By Janet Parkhurst
I just love this piece from the Glass Craft and Bead Expo. The women represent Earth, Wind, Fire and Water. I love the symbolism, I love that Bonnie used women...
Read more
By Janet Parkhurst
We often see people just standing in front of our foil display looking overwhelmed! Here is a picture of our display just so you can see how overwhelming it is! ...
Read more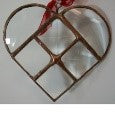
By Janet Parkhurst
Valentines Day is Coming To make the heart shown, use four 1x1" bevels and 2-2" half circles. You can also make it large by using 4- 1 1/2x 1 1/2...
Read more

By Janet Parkhurst
Info from Diamond Tech Glass Materials Needed:• Moretti Glass Rods: black, white & orange• Black and White Stringers• Bead Press• Stainless Steel Tweezers • Protective eyewear• Mandrels coated in bead...
Read more
By Janet Parkhurst
Luminescent glass is different than iridescent glass. It is low-fire—not high-fire like iridescent—and is intended for reverse fusing. What is reverse fusing? Reverse fusing means placing your piece face down...
Read more