
KEVIN’S PYRAMIDS




MODELING GLASS
Ever wish you could get more detail on a project? Modeling Clay is the answer. It was developed by Glass Bird Studios. It is a two-part kit that has a powdered binder and liquid medium. It is mixed with water and your own powdered glass or frit. Once it is mixed, it is the consistency of clay and you can work it like clay. It is food safe and non-toxic. You can pretty much do everything with it that you do with clay. Roll it, cut out shapes, put in silicone molds. You can then fire to a tack and get amazing detail. Glass Bird Modeling Glass Starter Kit (stainedglassexpress.com)
Lois Manno, the owner and developer of Glass Bird Modeling Glass, is a talented, experienced artist. Her love of nature shows in her artwork. She is most known for her feathers made from Modeling Glass.

 This incredible image is made by Bob Leatherbarrow, who is one of our industry’s amazing artist and teacher. He created the lines with Modeling Glass.
 See more of this work at www.leatherbarrowglass.com
(Picture from Brooks Mosaic And Glass -Ebay)
Cathedral. Glass that you can see through.
Opalescent. Glass that you cannot see through. It allows some light to show through, but not a clear image.
Streaky. A mix of two of more cathedral colors.
Cloudy/Wispy. A mix of a little (wispy) or a lot (cloudy) of white opalescent with a cathedral glass.
Seedy. Tiny air bubbles in the glass.
Granite, Hammered, Ripple, Catspaw. Fairly rough textures that may be pressed into the surface of the molten glass by a textured roller during manufacturing.
Waterglass, Baroque. Made only by Spectrum Glass. Created by manipulating the hot glass during manufacturing.
Mottled. Glass with organic spots of varying colors and densities.
Antique. Glass that is made by the traditional mouthblown method. Lines and random bubbles.
Semi-Antique. Machine made glass that resembles antique.
Glue chip. Fernlike or "Jack Frost" texture.
Iridescent. A shimmering, irregular colorful surface that looks like an oil slick.
Fusing Compatible. Used for fusing or beadmaking. It looks like regular glass but is labeled at the factory to show that the pieces will contract at the same rate when cooling. COE Coefficient of Expansion
Intermediate / Advanced
How To:
Frame Stained Glass Panels using Zinc Came
"Came" is a channel made from a variety of metals and is available in various shapes. The two most commonly used metals used to manufacture came are lead and zinc. We carry multiple sizes of both Zinc Came and Lead Came on our website. Zinc Came is available in different widths. The wider the width, the stronger it is. Zinc Came is rigid and can be a challenge to cut. It lends itself well to geometric shapes. When used as a border for a stained glass panel, it will provide a nice clean, strong edge to that panel. Choose a width based on the look of your piece as well as the size. “U” Came / Capping Came is easier to work with but has little strength. Materials & Tools Needed:Note: Click on photos to view them larger!
Note: Steps will not always happen in order, especially measuring and cutting. You will be going back and forth!
Measuring the Came: Cut a short piece (1” to 2”) of your Came to use as a marking gauge. Lay it over another piece of came (both pieces are laying on their side as though they were on a finished piece!) and mark the width of the gauge (both sides) onto the gauge came. Draw a diagonal from corner to corner of these marks. This will give you a 45° line to cut on.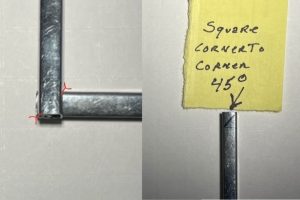 Making an accurate mitered edge
Using gauge came to measure and mark frame came After cutting, you can see the center channel lines up with the end of the glass panel
 Place the blade of your saw over the cut line and saw straight down. Let the saw blade do the work, do not force the cut. Cut all sides and make allowances for hangers. Dress each cut with a file to remove any burrs and to fine tune the angle that you cut.
 Look at that beautifully fitted mitered edge!
 Making room for a Handy Hanger Soldering the Zinc Came Frame: NOTE: Soldering Zinc requires more heat than copper foil. Dry fit the sides to your stained glass panel and secure in place with pins.
 (Popsicle Sticks can be used as shims under the glass, if tipping is noticed.)
 Details of angled soldering iron and finished and unfinished joints
 Wax and hang. Cleaners and Polishing (stainedglassexpress.com) Note: Completed panels can be heavy. Use a chain or cable that will easily support its weight. Sources: Everything Stained Glass – Molly Frances Ezine Articles – Maurine Summy Living Sun Glass – Samantha Calder James A Veilleux Researched, Interpreted and Arranged By: James A Veilleux 04/05/2023
(example is from C Rhodes Glass Art on Esty) Don' you love how your piece looks when it is foiled before it is soldered? That shiny copper foil just sparkles. Why, oh why then, is it so hard to get copper patina to look as good as the copper foil. The simple answer is tarnish! A beautiful patina finish is always about how the metal is prepared and cleaned before you apply the patina. So here are a couple of tricks we use at Stained Glass Express to get that professional look for copper patina. 1. After soldering, clean your piece with patina and flux remover. Then rinse well with tap water. Dry all the solder lines with a paper towel so there is no tap water left on the piece. 2. When the piece is dry, mix a solution of 3 parts distilled water and 1 part ammonia. Scrub the solder lines and joints with fine steel wool (0000) dipped in the ammonia solution. Scrub until all of the solder is a consistent satin finish silver. 3. Dry the piece with a paper towel. It is important at this point not to use tap water because the additives or minerals in the water may react with the patina. 4. Dip a paper towel into the patina and rub it all over the piece to cover the solder lines. The patina should come out very shiny. If there are spots that are not shiny, that means there is still tarnish on the solder in those places. Repeat the process over those spots to correct the problem. 5. Dry the solder lines and the glass with another dry paper towel. Immediately apply polishing compound and follow the manufacturer's directions for the product.
It is caused by flux boiling through the solder you’re laying down. That’s why you notice it more on the second side of a project – by then you have sealed off the other side, it can’t splatter out the back. As you may have guessed, the best thing you can do to limit this is use less flux.
The other possibility is that your soldering iron is hotter than necessary and causing more boiling. If you are sure you’re not using too much flux, try putting a temperature control on your iron.
Submitted by Wanda Shorty from an old issue of Stained Glass News
Tree of Life
1st place popular vote
Professional Stained Glass
Under the Cherry Tree
1st place popular vote
Professional Mosaic
 Below is a link to Mary’s website where you can see more of her amazing work.
Portfolio | Harris Art Glass
Glass Craft & Bead Expo | Las Vegas | Welcome! (glasscraftexpo.com)
This is the link where you can go and see the other amazing entries in the Gallery of Excellence. Once you click on it go to the top and click on Gallery of Excellence. Red letters in the white bar.
How to Effectively Solder
Stained Glass
By James Veilleux
Note: Soldering Stained Glass can be a fun but sometimes frustrating process. There is a definite learning curve involved but, with time and practice, the end result will be worth the effort. In order to even begin the soldering process, you need to have the right tools to successfully create a stained glass piece.Below are the 7 essential items necessary to Effectively Solder Stained Glass


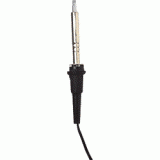
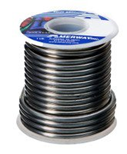
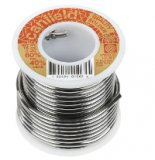



Credit for Info:
Amerway
Canfield
Novacan
Stellar Technical Products
Researched, Interpreted and Arranged By: James A Veilleux 03/08/2023Hopefully it is not a surprise that we are an industry that should be tuned into our personal safety. Not only do we deal with lead, but we also deal with lots of dangerous chemicals.
FLUX
Flux is one of the worst we deal with. It contains acids, sometimes solvents and other chemicals. We heat it up and create fumes. If you are not careful, you will be breathing these fumes. Set yourself up with a fume trap or at the very least something that is blowing the fumes away from you.

It is a little tough to do as you don’t want to cool your solder prematurely. Every chemical has an SDS (Safety Data Sheet) that is readily available. If you are concerned about the flux you use, read the SDS sheet. We have them on our website.
Safety Data Sheets – Stained Glass Express
SOLDER
Solder is made with lead (unless you are using lead-free). I don’t know anyone who wears gloves when soldering. People generally have the soldering iron in one hand and a strip of solder wire in the other. Lead is absorbed through your skin so that is the real health issue there. If you are not going to wear gloves, then wash your hands after use with heavy metal soap. Years ago, we had Safety Works in doing some safety testing for us. He told me to get the soap and have it at the sinks and then sell it and not be bashful about pushing it on people. They are touching lead and they need it! So, yes, we have it in our bathrooms and at our classroom sink and we sell it. You need this so buy it and use it! Don’t eat where you solder. Just don’t. If you are making something that people are going to handle (jewelry, nightlight, boxes), use lead-free solder.
We have great feedback on this Amerway Tourmaline Lead Free Solder. It is the shiniest!

GLASS HANDLING
Stained glass people love to pick up a big sheet of glass and hold it over their head and look through it. DON’T DO THAT! If it breaks it is breaking into your open eyes! Don’t let glass slide down in your hands. That cut will need more than a band aid. In our retail store, we take care to push the glass into the display cubbies every day. We don’t put short sheets down into the record racks where people can skin their hands trying to get the pieces out. We put the taller glass to the back so people are not reaching over it. We are checking the scrap glass all the time as it is sharp and pointed. Wear glasses when cutting and grinding.

Wear gloves for glass handling.
Wear a dust mask when using glues and powders. This is supposed to be fun.
Stay safe!
Glass Pigments
| Compounds | Colors |
| iron oxides | greens, browns |
| manganese oxides | deep amber, amethyst, decolorizer |
| cobalt oxide | deep blue |
| gold chloride | ruby red |
| selenium compounds | reds |
| carbon oxides | amber/brown |
| a mix of manganese, cobalt, iron | black |
| antimony oxides | white |
| uranium oxides | yellow-green (glows!) |
| sulfur compounds | amber/brown |
| copper compounds | light blue, red |
| tin compounds | white |
| lead with antimony | yellow |
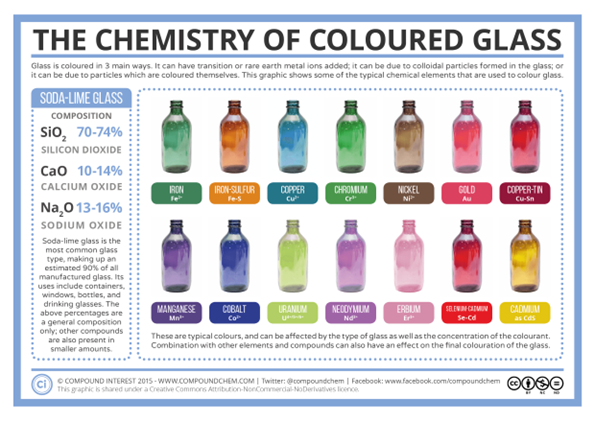 Because these minerals are in the glass, they can react with one another when they come in contact. Some products have been developed for just that purpose. Oceanside has frit and glass called Red Reactive transparent and Red Reactive opal. It will react with any glass that has copper in it. It will give a deep reddish color where the reactive frit and copper-bearing glass intersect.

 Oceanside Compatible Red Reactive Opal Coarse Frit 96 COE (stainedglassexpress.com)
Oceanside Compatible Red Reactive Opal Frit Fine 96 COE (stainedglassexpress.com)
Oceanside Compatible Red Reactive Opal Frit Medium 96 COE (stainedglassexpress.com)
Oceanside Compatible Red Reactive Opal Powder Frit 96 COE (stainedglassexpress.com)
Oceanside Compatible Red Reactive Transparent Frit Coarse 96 COE (stainedglassexpress.com)
Oceanside Compatible Red Reactive Transparent Frit Fine 96 COE (stainedglassexpress.com)
Oceanside Compatible Red Reactive Transparent Frit Medium 96 COE (stainedglassexpress.com)
Oceanside Compatible Red Reactive Transparent Frit Powder 96 COE (stainedglassexpress.com)
 Oceanside Red Reactive Opal Stringer 96 COE (stainedglassexpress.com)
 Oceanside Red Reactive Transparent Noodles 96 COE (stainedglassexpress.com)
 Oceanside Red Reactive Transparent Stringer 96 COE (stainedglassexpress.com)
Sulfur-bearing products will also react with copper bearing products. The link below will bring you to Oceanside’s Reactive charts.
Reactive Guide – Oceanside Art Glass (oceansidecompatible.com)
Vanilla Cream is a high sulfur content glass that is also reactive, it even changes from within. After full fusing the inside of the glass stays its pre-fused off-white color while the outside brightens to a vivid warm white.
Oceanside Vanilla Cream Opal Glass (stainedglassexpress.com)
Bullseye also has reactive products.

 Bullseye Reactive Cloud Opal Frit- Medium 90 COE (stainedglassexpress.com)
Bullseye Reactive Cloud Opal Frit- Powder 90 COE (stainedglassexpress.com)
This is a link to the Reactive Potential of Bullseye Glass. It is truly amazing and very fun to play with these combinations.
Reactive Glass Chart.pdf (amazonaws.com)


