Intermediate / Advanced
How To:
Frame Stained Glass Panels using Zinc Came
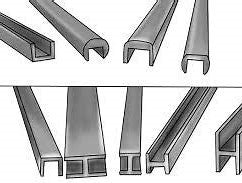
"Came" is a channel made from a variety of metals and is available in various shapes. The two most commonly used metals used to manufacture came are lead and zinc. We carry multiple sizes of both
Zinc Came and
Lead Came on our website. Zinc Came is available in different widths. The
wider the width, the
stronger it is. Zinc Came is rigid and can be a challenge to cut. It lends itself well to geometric shapes. When used as a border for a stained glass panel, it will provide a nice clean, strong edge to that panel. Choose a width based on the look of your piece as well as the size. “U” Came / Capping Came is easier to work with but has little strength.
Materials & Tools Needed:
- Your Stained Glass Panel
- Your choice of Zinc Came
- Your choice of hangers (we show Handy Hangers in this tutorial)
- Ceiling Tile or equivalent heat resistant work surface
-
Push Pins (Straight Edges – Optional)
- Sharpie
- Ruler / Measuring Tool
- Fine toothed Hack Saw or Came Saw (Miter Box – Optional)
- Metal File
- (Masking or Electrical Tape - Optional)
- Soldering Iron, Stand, and Damp Sponge
- 60/40 Solder
- Flux and Flux Brush
Note: Click on photos to view them larger!
Note: Steps will not always happen in order, especially measuring and cutting. You will be going back and forth!
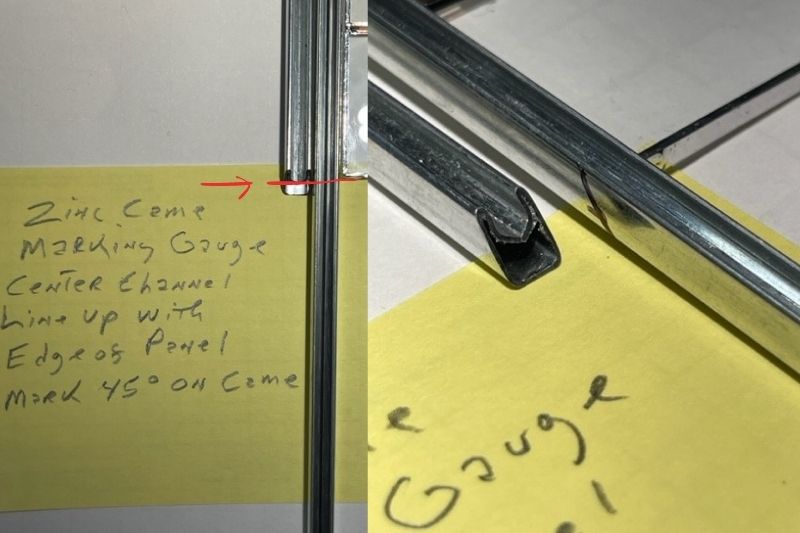
Measuring the Came: Cut a short piece (1” to 2”) of your Came to use as a marking gauge. Lay it over another piece of came (both pieces are laying on their side as though they were on a finished piece!) and mark the width of the gauge (both sides) onto the gauge came. Draw a diagonal from corner to corner of these marks. This will give you a 45° line to cut on.
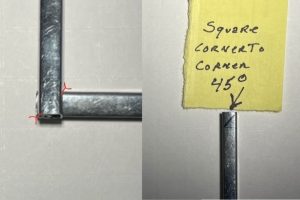 Making an accurate mitered edge
Place a length of came on the bottom edge of your panel. Place your mitered gauge next to it so the end of the center channel lines up with the end of the glass panel. Mark the 45° angle onto the frame came piece.

Using gauge came to measure and mark frame came After cutting, you can see the center channel lines up with the end of the glass panel
Cutting the Came: Note: After all this, you may find that a Miter Box will simplify this process! 
Place the blade of your saw over the cut line and saw straight down. Let the saw blade do the work, do not force the cut. Cut all sides and make allowances for hangers. Dress each cut with a file to remove any burrs and to fine tune the angle that you cut.
 Filing the came
 Look at that beautifully fitted mitered edge!
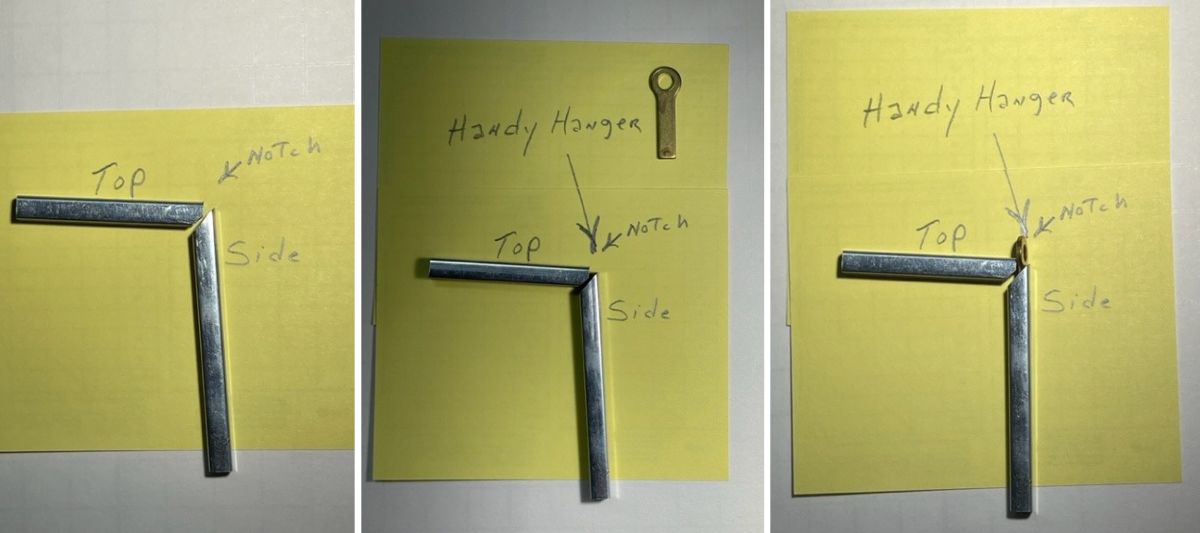
Hangers, Part 1: Plan ahead for what type of hanger you will use. We recommend Handy Hangers, which require a tiny modification to the top piece of zinc came. See the three-step photo below that shows a small notch filed off the top piece. When dry-fit together, the Handy Hanger will slide down into the side piece of zinc through that notch (note that it is shown flat in the second picture, and is then rotated sideways in the third photo to fit into the side.)
 Making room for a Handy Hanger Soldering the Zinc Came Frame: NOTE
:
Soldering Zinc requires more heat than copper foil. Dry fit the sides to your stained glass panel and secure in place with pins.
 (Popsicle Sticks can be used as shims under the glass, if tipping is noticed.)
NOTE:
Tape can be used to control/contain the solder. (If used, the tape must be stuck to the zinc prior to the flux application.) NOTE: Flux should be applied 1 joint at a time for best results. Side 1 : Solder each edge joint (all that are touching the side of the zinc came), working all the way around the 4 sides until all of the intersecting joints are soldered to the zinc came.
Hangers, Part 2 : If using Handy Hangers, tin them and slide them into the notch you created. If using another hanging method, either make or prepare (modify) the hangers to fit into the vertical zinc channels. Tin the hangers and place them into the channels. They will be soldered in place at the same time as the corners are done.
Corners : Apply a small amount of solder, using the chisel edge of the soldering iron, directly over the corner seam. Keep applying small amounts of solder in this manner until you see that it has penetrated the seam.
 Details of angled soldering iron and finished and unfinished joints
Side 2: Carefully flip your panel and repeat the same process as Side 1.
Finishing: Clean the panel thoroughly. If needed,
oooo Steel Wool can be used on the Zinc Came to brighten it or remove oxidation caused by the flux. If you Patina your panel, your best results will be achieved by using “JAX”
Pewter Black.

Wax and hang.
Cleaners and Polishing (stainedglassexpress.com) Note: Completed panels can be heavy. Use a chain or cable that will easily support its weight. Sources: Everything Stained Glass – Molly Frances Ezine Articles – Maurine Summy Living Sun Glass – Samantha Calder James A Veilleux
Researched, Interpreted and Arranged By: James A Veilleux 04/05/2023