$20 Flat Rate Shipping to Contiguous U.S.
Currency
Tools for Effective Soldering

Tools for Effective Soldering

How to Effectively Solder

Stained Glass

By James Veilleux

Note: Soldering Stained Glass can be a fun but sometimes frustrating process. There is a definite learning curve involved but, with time and practice, the end result will be worth the effort. In order to even begin the soldering process, you need to have the right tools to successfully create a stained glass piece.

Below are the 7 essential items necessary to Effectively Solder Stained Glass

  1. Soldering Iron
The soldering Iron is the most important tool that you will need to solder stained glass. The soldering iron is used to melt the solder that will fuse the foiled stained glass pieces together. It is important to use a high-quality soldering iron, preferably with a means of controlling the temperature, to make the soldering process successful and increase the soldering iron's longevity. The soldering iron should be hot enough to allow the solder to flow over the seam of the foiled glass pieces. Too much heat will allow the solder to pass through the seam and possibly crack the glass. Soldering Irons & Accessories (stainedglassexpress.com) soldering iron
  1. Solder
Solder is a metal alloy that is used to join metal parts together. Solder comes in different variations, but for stained glass, the best choice is a solid-core wire solder. However, you will need to choose the solder that works best for your project or piece. Solder is usually made of Tin and one or two other metals such as Lead, Copper, or Silver. Solder comes in both Lead and Lead-Free variations. Stained glass uses solid solder with an external flux. 60/40 Solder is typically used for stained glass projects. The first number is the percentage of Tin (SN) while the second number represents the percentage of Lead (PB). 50/50 Solder is sometimes used for certain applications and requires more heat to work due to the increased lead content. Solder (stainedglassexpress.com) roll of solderroll of solder
  1. Flux
Flux is the chemical solution that is used to clean and join the metals. It helps the solder flow with the Copper Foil or Came. It is placed on the joint before the soldering begins to create a strong bond and hold. Flux comes in either a liquid, gel, or paste form. You will need to find a flux that works with your solder. Flux comes in different forms including Organic Acid, Water-Soluble, Inorganic and other forms. Never use directly from the original container in order to preserve the strength of the flux. Soldering Flux (stainedglassexpress.com) white bottle with blue lid contains flux oleic acid bottle white bottle with green lettering contains flux bottle with purple lid and label contains gel flux
  1. Sponge or Brass Wool
A Damp Sponge or Brass Wool specifically made for soldering is important to have on-hand to help while you solder to help preserve your soldering iron tips. When you solder a stained glass piece, you need to apply solder throughout the process or project. However, before adding any solder to your soldering iron, you need to clean the tip by lightly dragging it across a slightly damp sponge or inserting it into dry brass wool to remove the oxides and re-tin the tip. This needs to be repeated throughout the soldering process when you notice that the tip has oxidized (blackened). a rectangular yellow kitchen sponge
  1. Flux Applicator or Brush
A Flux Brush or Applicator (Q-Tip)is used to apply the Flux onto the metal areas to be joined. The Flux Brush can last a long time if rinsed at the end of each soldering session. If not rinsed, the flux will stay active and corrode the bristles and metal handle of the brush. Flux Brush 12 Pack (stainedglassexpress.com)
  1. Heat Resistant Surface
You will need a Flat, Burn-Resistant surface to work on your soldering project. This surface should allow pins to be used for the purpose of securing your stained glass project from movement. A ceiling tile is a good choice for this surface. Always use the unpainted side to work on.
  1. Gloves and Mask
If you are using Leaded Solder, it is important to wear chemical resistant gloves at a minimum. A Mask and Safety Glasses are recommended for protection from all flux fumes and solder splatter. We also highly recommend keeping Heavy Metal removing soap on hand at all times.

Credit for Info:

Amerway

Canfield

Novacan

Stellar Technical Products

Researched, Interpreted and Arranged By: James A Veilleux 03/08/2023
Read more

Glass Safety

SAFETY

June is National Safety month.

Hopefully it is not a surprise that we are an industry that should be tuned into our personal safety. Not only do we deal with lead, but we also deal with lots of dangerous chemicals.

FLUX

Flux is one of the worst we deal with. It contains acids, sometimes solvents and other chemicals. We heat it up and create fumes. If you are not careful, you will be breathing these fumes. Set yourself up with a fume trap or at the very least something that is blowing the fumes away from you.
Weller Fume Trap Smoke Absorber
It is a little tough to do as you don’t want to cool your solder prematurely. Every chemical has an SDS (Safety Data Sheet) that is readily available. If you are concerned about the flux you use, ask for the SDS or look it up online. You will have all (or more) the information you could possibly want.

SOLDER

Solder is made with lead (unless you are using lead-free). I don’t know anyone who wears gloves when soldering. People generally have the soldering iron in one hand and a strip of solder wire in the other. Lead is absorbed through your skin so that is the real health issue there. If you are not going to wear gloves, then wash your hands after use with heavy metal soap. Years ago, we had Safety Works in doing some safety testing for us. He told me to get the soap and have it at the sinks and then sell it and not be bashful about pushing it on people. They are touching lead and they need it! So, yes, we have it in our bathrooms and at our classroom sink and we sell it. So here it is. You need this so buy it and use it! Don’t eat where you solder. Just don’t. If you are making something that people are going to handle (jewelry, nightlight, boxes), use lead-free solder. We have gotten great feedback on this Amerway Tourmaline Lead Free Solder. It is the shiniest!

GLASS HANDLING

Stained glass people love to pick up a big sheet of glass and hold it over their head and look through it. DON’T DO THAT! If it breaks it is breaking into your open eyes! Don’t let glass slide down in your hands. That cut will need more than a band aid. In our retail store, we take care to push the glass into the display cubbies every day. We don’t put short sheets down into the record racks where people can skin their hands trying to get the pieces out. We put the taller glass to the back so people are not reaching over it. We are checking the scrap glass all the time as it is sharp and pointed. Wear glasses when cutting and grinding. Wear gloves for glass handling. Wear a dust mask when using glues and powders. This is supposed to be fun. Stay safe!
Read more
Specialty Frits

Specialty Frits

SPECIALITY FRITS

Frit is crushed glass, ranging in particle size from a fine powder to fine, medium, coarse and mosaic. It is made from crushed, screened and cleaned COE tested sheet glass. It is used by artists as a coloring agent or used to created decorative effects when blowing glass or fusing. Often used to achieve the effect of painting on glass.

Metallic Irid Frit

Metallic Frit is to give a silver/gold metallic shimmer in fused work. Doesn’t look like much in the bottle but once fused it will stand out. It IS different from rainbow irid frit. It looks best over dark colors or black to achieve the dramatic multi-layer metallic shimmer. It is available in Medium, Coarse and Mosaic sizes.

Clear Rainbow Irid Frit

Rainbow Iridized adds a mother of pearl shimmer to your fused work. It is made from Iridized glass which has a surface treatment where a layer of metallic oxide is bonded to the hot glass surface just after the sheet forming, resulting in a colorful, shimmering effect.

Red Reactive Frit

Comes in both opal and transparent. This frit works with chemistry and heat to create stunning effects. Red Reactive has elements that will react to the metal content in other colors and create unique color shifts and rings. A normal reaction would be a very thin line in a reddish hue around the added glass embellishments. Reactive Guide – Oceanside Art Glass (oceansidecompatible.com)

DICHROIC FRIT

(this info from Coatings by Sanburg)

Dichroic coating is made by melting Quartz Crystal and Metal Oxides. These Materials are vaporized with an electron beam gun, and the vapor then attaches and condenses onto the surface of the glass, forming a crystal structure comprised of as many as 30 layers. Dichroic frit is not sheets of glass with a dichroic coated smashed up. It is already frit and then it is coated with a dichroic coating. That means that more of the surface is coated. Approximately 80%. It also comes in colors but the black and the clear are the most popular.
Read more
So Many Pliers!

So Many Pliers!

SO MANY PLIERS! When customers are new to stained glass, it can be overwhelming figuring out which tools to buy. As if choosing a soldering iron wasn't complicated enough, something that seems as simple as pliers ought to be easy, right? Maybe not! There are several tools that are used for breaking glass along a score. We suggest beginners start with a combo breaker/grozer. It is like two pliers in one. You can use the pliers to break the glass on the score line. Position the edge of the plier parallel to the score line with the curved jaw on the bottom. Holding the glass on the other side of the score with your hand, snap up/pull the piece apart. (Use a pair of grozing pliers on each side to break narrow pieces.) Once you've cut a piece, small bits that stuck to the score can be "chewed" off with the tips of the pliers. Just nibble those little bits right off to reduce the amount of grinding in your future. Then we suggest a runner. The jaws of a runner are slightly curved to create a fulcrum. There is a line on the tip of plier that you'll lay over the score line. Some runners have an adjustable screw to control pressure; the screw should be on the top side of the pliers (screw points up so you don't screw up!) Squeeze gently to start; you'll feel the score "running" away from you along the cut. The rubber tips eventually get torn up by the sharp glass and it really does make a difference in the pliers' performance. Get reasonably priced replacements here. There are other variations of running pliers that run the gamut of cost and function. The Silberschnitt pictured on the right is a high-end plier designed to be very exact and can break up to 5mm of glass. They can help with inner curves and small glass strips. Some people really like a plain breaker. These pliers have a smooth jaw for snapping the glass apart. They often have a wider jaw than a grozer. What are your go-to tools for breaking glass along a score? Which tool did you wish you had as a beginner?
Read more
Glue in the Kiln

Glue in the Kiln

There is a lot to chat about when it comes to glue in glass fusing. Let’s start with these cute little owls with wonky eyes. They started out with the pupils glued to the white nugget eyes. Since the glue cooks off at about 450F, the eyes just slid off the nuggets and landed where they wanted during firing! Solution? Drill a bit of a hole and the little dots will stay put and you will have sweet little eyes like the one in the second picture (done by Liz Watts of Rocky Coast Treasures). There are many different glues that behave differently and have different uses. Let's take a look at a few! GlasTac Blue Gel This blue gel has a thick viscosity and minimizes slipping even when not dry. GlasTac Pink Use the pink glue on something already set in place. The pink glue is runny and if you squeeze a tiny drop next to the element it will wick under the glass. Aloe Vera This is good for when you don’t want it to “set up”. It keeps pieces stable, but you can keep moving them about. Best to use generics because the name brands have added ingredients that can cause trouble. Hair Spray When do you use hair spray on your hair? When you are done! Same with using it on glass. It is a top-down adhesive. You spray to keep something as you have it, especially little things like fine frit. Buy it cheap with a pump. HoneyDoo Glue A gel consistency with quick set times and a clean bond. It has a stiletto tip nozzle which allows precision. Great for glass fusing. Super New Glue Our favorite super glue here at Stained Glass Express, it is formulated to dry clear. It comes in a tiny bottle so you don't have to worry about it drying out before you get a chance to use it! SOME GLUING TIPS: Put glue close to the edge of the top piece so that it can dry quicker. Stuck to the wrong place? Hopefully you put the glue near the edge! Use a razor blade to carefully scrape at the glue. Superglue that is not specifically designed for fusing may not dry clear and can give off toxic fumes during firing. Here is some helpful info. How do I unstick my fingers? (This section reproduced from How Stuff Works) Let's say you're repairing some broken pottery and before you can say "Whoops," you've glued your index finger to your thumb! The recommended first aid treatment for this is:
  1. Scrape off any excess glue. Don't use cloth or tissue -- a chemical reaction between the fabric and glue could potentially cause burns or smoke.
  2. Soak the bonded fingers in a bath of warm, soapy water.
  3. Don't try forcing the fingers apart, or you'll tear the skin.
  4. After soaking, use dull, rounded utensil to carefully wedge the fingers apart.
  5. If you see no immediate success with this, drop a little acetone (found in nail polish remover) on the area. Again, try wedging the digits apart.
At first, the thought of someone getting Super glue on his or her mouth seems outlandish. But let's face it a lot of us have a bad habit of using our teeth to wrench or twist off particularly stubborn caps. Say you do that with the top of the tube of glue and, presto, you've given an entirely new meaning to the phrase "zip it." In order to unzip those lips, your options on what to do are a little more limited:
  • Since you're dealing with an area on the face, do not use acetone.
  • Using a wide coffee cup or bowl, immerse your mouth in hot water.
  • You will also want to dampen the bonded skin from the inside of your mouth as much as possible.
  • Once you sense a loosening of the grip, use a dull, rounded utensil to wedge your mouth open. Be careful not to force it, or you will tear the skin.
Of course, glue is made for keeping things together; researchers have modified super glue to become less toxic, making it an ideal replacement for stitches (even veterinarians use it!) So if you've got yourself stuck and find the instructions above aren't working, we recommend you seek professional medical help! What's your favorite type of glue for fusing? Have you experienced any kiln disasters that eventually came down the type of glue that was used? Let us know in the comments below!
Read more
Grinder Bits

Grinder Bits

The biggest question we get about grinder bits is "how long will it last?" Tough one! Depends on how much you use it. A bit can be adjusted up and down, and carefully you can use lots of the surface. Once you get a bare spot, move the bit up or down. Normally your wear will be even all the way around the bit. Occasionally, you will get a bare spot. You can still use the space above and the bare spot. The next biggest question we get is, "how do I get my bit off the shaft?" It's stuck! What you do not want to do is bend your shaft so do this very carefully. We send someone to our classroom every week to take the bits off, rinse them, and put them back on. That keeps the gunk from building up between the bit and the shaft and behaving like it is cement. The only way to get it off is patience! That is a bit tough when you just want to use your grinder. Take some 3 in 1 penetrant, (or any of these chemicals designed to loosen metal), let it set and see if it comes loose. If not, do it again and again and again until it does. In this "there is a gadget for everything" world, there are now different grits. These grits include: XFine, Fine, Medium, and Coarse. The fines are great for when what you are grinding is chipping. Glass with a surface, like mirror or irid for example. In the old days, we saved our old worn regular bit for this. Coarse or speed bits are for when you have quite a lot of glass to grind off. When you get too close to where you want to be you will probably switch back to regular as the coarse is a coarse grind. There are also sizes to get you into smaller spaces: For these bits each manufactures look a bit different, but most are interchangeable. There are also some specialties bits---like a lamp bit. The ripple bit is so you can grind rippled glass and it is smoothed out for foiling. The radius is a combination of flat and a place to round the edges to get rid of a sharp edge. It is used mostly for mosaics. The lamp head allows a nice, angled grind so angled pieces will fit well together. The Quick Fit System has become popular with the new Techniglass Grinders and can be used on other grinders. When the grit wears off you can just buy a replacement sleeve and not the entire fixture.
Read more
GETTING STARTED - FUSING

GETTING STARTED - FUSING

Info taken from Spectrum Glass System 96 Getting Started with Kiln-fired Glass
  1. WHAT IS FUSING
Stacking two or more layers of compatible glass to make a design and then melting it by placing it in a kiln. You can flat fire or slump. Bring the kiln to 1300 - 1500 decrees F to flat fuse. Create a tile, trivet, suncatcher, coaster or art. You can leave your piece flat or slump it into a mold or drape it over a mold to get a 3-D piece such as a bowl, tray, platter or vase. 2. COMPATIBILITY This is very important. Only glass that is compatible can be fused together. Glass expands when it is heated and contracts when it cools. Glass from different manufacturers have their own rate. This is called Coefficient of Expansion (C.O.E.). Most common are 96 and 90. Youghiogheny, Wissmach and Oceanside all produce 96. Bullseye is commonly thought of as 90 but they call themselves Bullseye compatible. 3. TOOLS AND SUPPLIES If you are already doing glass work you may have many of glass cutting tools like a cutter and pliers (breaking, running, grozing). You will also need glue (lots of types available), kiln paper, molds, primer, shelves. brushes. https://www.stainedglassexpress.com/fusing_supplies/ PLANNING YOUR DESIGN You can use a pattern. There are lots and lots available. You can design your own. There are lots of on-line ideas on Pinterest, Instagram and Facebook. Another technique is called Frame Focus, Fill. Create your frame or your base, create a focal point (a central element that draws the eye. The Fibonacci sequence (which our logo is) is a great one to follow. 4. MAKING THE PROJECT There are lots of fun things to add to yur projects called accessory glass. Rods, pebbles, frit, stringers, noodles, ribbons, precuts, dots and millefiori. ASSEMBLE YOUR PROJECT Gluing does help to hold things together until they are in the kiln. Use it sparingly. to keep from using too much apply with toothpick. "Over the counter glues" like Elmers can char if you use too much and "Super Glue" (Not Super New Glue) does not always burn off clear. Klyr-Fire gives you time to work and burns off. GlasTac blue has viscosity and keeps things from slipping when not dry. GlasTac blue can be applied after something is in place. Squeeze a drop next to the element and it will wick under. Super New Glue is great and easy to use. Lots of good options. https://www.stainedglassexpress.com/fusing_supplies/ 5. FIRING Load the Kiln Keep projects 2" from elements The Center is the most evenly heated. Deep or difficult should go there. Most molds have to be elevated on kiln furniture 6. PROGRAM THE KILN With a glass kiln you ramp and hold. Kilns come with a controller where you can program in what you wish. It is a three part. You enter:
  • The Ramp. The rate in degrees per hour, that kiln temp will rise or fall during the segment
  • The Goal Temp. The temperature the kiln will seek during each segment.
  • Hold Time. the number of minutes the kiln will stay at the Goal Temp, once it is reached.
It is wonderful if you can purchase a kiln, but if you cannot, you can rent kiln space at a glass store. BASIC PROGRAMS
  • Tack Fuse: glass is joined with little change beyond the softening or rounding of glass edges.
  • Contour: The glass edges are soft and rounded, yet the project surfaces retain a degree of dimension.
  • Full: Works best on two layer projects containing an even amount of glass on each layer. These will melt together completely and smooth surface.
  • Slump: This is a second trip to the kiln and it is taking what you have created and put it in a mold to "slump" into the shape of the mold.
There is MUCH, MUCH, more we could go into but this is just the basics.
Read more
CONTROLLING YOUR SOLDERING IRON TEMPERATURE

CONTROLLING YOUR SOLDERING IRON TEMPERATURE

Temperature controllers are generally separate units that the iron plugs into. They are small, easy to use and relatively inexpensive.

It operates similar to a light dimmer switch. By dialing the control to a higher or lower setting, more or less electricity is fed to the iron. This increases or decreases the iron temperature, allowing the tip temperature to be controlled.

https://www.stainedglassexpress.com/Glass-Tools/Soldering-Irons-and-Accessories/soldering-iron-temperature-controller.html

Ceramic Heating Element Irons

A temperature control/iron combination offers you greater control and flexibility than a temperature controlled tip iron when working with different metals and solder mixes. Look for one that is at least 80 watts. Since the flow of electricity to the tip is consistent and never completely stops, encounters with cold spots are nearly eliminated.

Hakko Soldering Iron FX 601 (stainedglassexpress.com)

These irons are relatively new to the stained glass trade. They are made with highly efficient ceramic heating elements. Like a ceramic room heater, they produce a consistent temperature using less electrical wattage during operation. When initially heating and when reheating during "recovery" periods, they can draw a "burst" of power exceeding100 watts and then efficiently reduce electrical consumption, often below 60 watts, during the soldering process. The result is efficiency and economy.

A remarkable feature of ceramic heater irons is they generally reach operating temperature in less than 60 seconds. Of the three types of irons, the ceramic heater type best maintains consistent tip temperature.

Irons with Temperature Controlled Tips

These irons are supplied with an internal regulator in the tip that does not allow the iron to exceed a predetermined temperature. An example would be a 600°F tip. The iron heats to that temperature then "shuts off." When heat is required, the iron "turns on" again. Tips are available in predetermined temperatures up to 800°F. These irons are easy for beginners to use because the temperature is automatically maintained for you, however, as your skills increase, you may prefer to control the amount of heat yourself for different soldering situations. The limited amount of control may become frustrating as your soldering skills increase. With this type of iron you will likely encounter "cold spots" where the iron will not melt your solder. These cold spots occur when heat is being drawn out of the tip faster than it is being replenished. You will need an iron with a minimum of 100 watts.

The Weller 100 is one of these irons.

Stainless Steel Heater Technology

These are nice stable irons. Best to use them with a separate controller. The biggest advantage is if you drop this iron it does not have a ceramic element that is very easily going to break. These are little workhorses.

Weller SPG80 Soldering Iron (stainedglassexpress.com)

100 Watt Pro Soldering Iron (stainedglassexpress.com)

Read more

FOOD SAFE ISSUES

I think I have not researched an issue and come up with less concise data ever. Here are some things I did find.

FUSING

The causes of concern when fusing are lead and cadmium. Cadmium when combined with sulfur forms Cadmium Sulfide and results in deep yellow color. If mixed with Selenium and Sulfur, it gives you bright red and orange. Adding Titanium produces yellowish-brown glass. https://www.bullseyeglass.com/is-bullseye-glass-food-safe.html At this link you can find the list of Bullseye glass that contain more than 1% lead and more than .5% of cadmium. They recommend this list be capped with clear. They also said that transparent glass leaches lead/cadmium at levels below FDA limits and less than opalescent lead/cadmium-bearing glass. So, you can decide not to cap transparent glass. I also found from Randy Wardell in his book "Everything Else", this: The official answer from the glass manufacturers is, all tested compatible glasses have been tested by the FDA for food bearing surfaces and were determined to be suitable. However, if you add other processes or compounds to the items, for example paint, stains, decals, glazes, etc. it is important to check that these items are also approved for food bearing surfaces.
  • Glassline pens are lead free and food safe.
  • Mika powder must be capped.
  • Iridized glass needs to be capped. Bullseye irid is safe if full fused.
  • By spraying a coating of Fuse Master Super Spray on top - food safe.
The bottom line seems to be, if you have any concerns top the piece with a sheet of clear when fusing.

FLAMEWORKING

Clear Boro (COE 33) is food safe. Think Pyrex. Boro colors with high metal content or fuming are not food safe. Boro is food safe if the colors with high metal contents and fuming are not the surface. The metals can cause issues in microwaves and sometimes older dishwashers that get really hot during the drying cycle. I was not able to find a list of Boro colors with high metal content. However, here is a little info on metal oxides. When glass color is made, the metal oxides are stable and "in solution," anytime you work with the glass, in any manner, you may be breaking open "the solution" and expose the metal oxides. Rods can contain: Iron Oxide, Chromium, Sulfur, Calcium, Manganese, Manganese Dioxide, Cobalt, Arsenic, Potash, copper Oxide, Nickel, Chromium, Tin Oxide, Cadmium, Titanium, Uranium, Didymium, Selenium, Copper, Gold & Silver.

TRADITIONAL STAINED GLASS

In traditional stained-glass work where you solder, there are also concerns. If the product is going to be near food or next to your skin, you should use lead free solder. Or, if you are doing something like a night light for a child's room, use lead free solder. Lead toxins can be absorbed through the skin.
Read more

TIDBITS OF INFORMATION

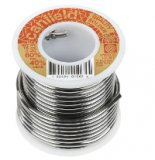
What is the difference between copper wire and tinned copper wire?

They are both copper wires. The tinned wire is a bit easier to use if you are soldering it because it already has a coating of solder on it.

https://www.stainedglassexpress.com/metals/wire/

************************************************************************************************************

So many foils!

Different backing, different widths, and different thicknesses

Why does this matter? Take a look.

Can you see how the color of the backing shows through? It matters when you are using see through glass. It helps when the patina matches the backing. Like the center one is black backed. If that copper on the outside gets patinaed black it looks good. If you were doing a piece with a lot of see-through glass and you used copper back, you would be sad, disappointed and distracted by the copper peaking out at you.

https://www.stainedglassexpress.com/metals/copper_-_silver_foil/

**************************************************************************************************************

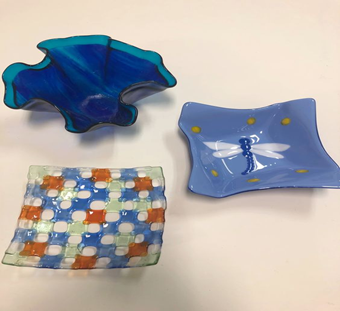
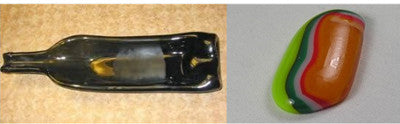
FUSING WITH NON-FUSIBLE GLASS

Can you do it? Yes. However, you cannot mix sheets because the coe is unknown. If you know that two pieces of glass came from the same sheet, you could fuse them together. Sometimes non fusible glass will devitrify. Probably because you don't really know what temperature to fire it at. If you coat it with Spray A that generally takes care of it. This is also good for slumping bottles. They come out clearer if you coat the up side with Spray A.

https://www.stainedglassexpress.com/Chemicals/fusing-chemicals-kiln-wash/hotline-spray-a-plus-16-oz.html

You could take two wispy pieces of glass from the same sheet and put one across the other with the wisps going in a different direction and get a nice effect.

You cut shapes from one piece and fuse to another piece if they are from the same sheet.

You could take single pieces and slump them into a vase.

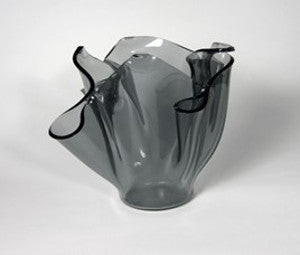
Pic from Glass with a Past
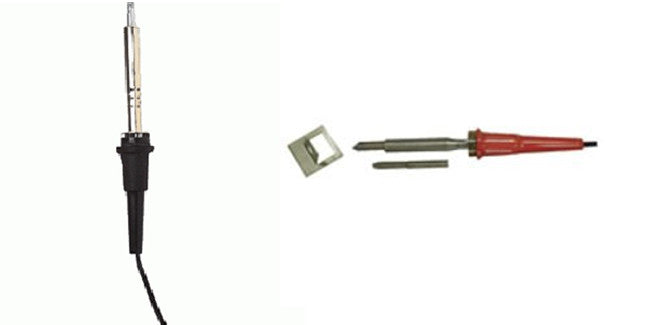
*************************************************************************************************************

TRACKING HEAD

https://www.stainedglassexpress.com/Glass-Tools/Hand-Tools/cutters-shears-and-snippers/heavy-duty-wide-head-brass-glass-cutter.html

This is a great cutter for straight cuts. You just will not believe how much easier it is to use.

**************************************************************************************************************

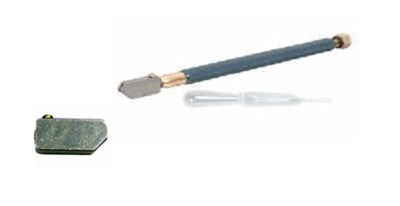
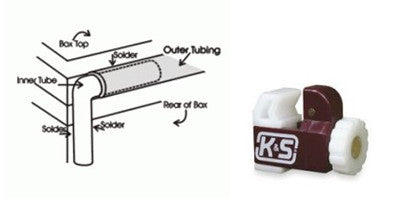
CUTTING TUBES WITHOUT CRUSHING THEM

When cutting a tube, put a toothpick in the end where you are cutting, and it will keep you from crushing the tube.

https://www.stainedglassexpress.com/Glass-Tools/Hand-Tools/cutters-shears-and-snippers/tubing-cutter.html

**************************************************************************************************************

Have an old circle cutter you no longer use to cut glass? Use it to cut paper.

**************************************************************************************************************

PLIERS - WHICH END IS UP?

RUNNING PLIERS - Just cannot live without them. They are used to run a score. You just position the jaws at the end of the score line and gently squeeze. To remember which end is up, remember the saying "screw up or screw up"

https://www.stainedglassexpress.com/Glass-Tools/Hand-Tools/pliers/metal-running-pliers.html

GROZIER PLIERS

I learned this one just this week. Your pliers should look like alligator head to be the right way.

https://www.stainedglassexpress.com/Glass-Tools/Hand-Tools/pliers/grozer-breaker-pliers.html
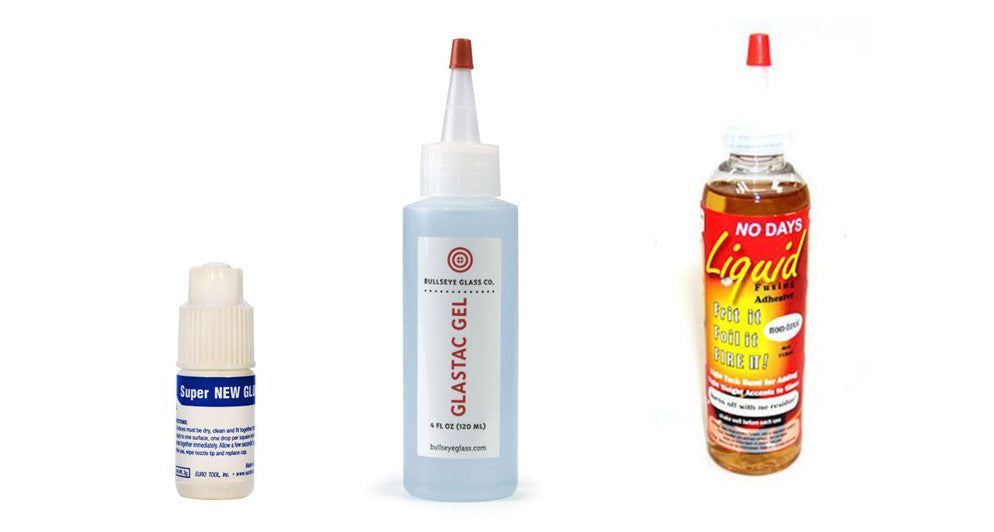
Read more

MURPHY'S LAWS FOR STAINED GLASS

(I would like to give credit for this, but I no longer know where I got it)

Solder Law: Hot solder looks exactly like cold solder.

Solder Law II: One lead joint will always be unsoldered.

Breakage Law: The number of bad breaks you get is directly proportional to the price of the glass.

Breakage Law II: The number of bad breaks is an opposite proportion to the amount of glass on hand.

Breakage Law III: The number of bad breaks is proportional to the distance from your supplier.

Law of Studio Geometry: Any horizontal surface is soon piled up.

Law of Focus: At the most difficult point in construction of any project, the phone will ring.

Law of Focus II: The moment your hands touch lead, flux or patina, extreme hunger pangs will commence.

Law of Commerce: Everyone knows someone who does glass....cheaper.

Replacement Law: The moment you replace a lost tool with a new one, you will find the original.

Installation Law: The time required to install is proportional to the number of people watching.

Installation Law II: The tool you desperately need is back at the studio.

Common Sense Law: There is no such thing as a clean stained-glass window.

Common Sense Law II: The number of people you did not know were listening is proportional to the severity of the swear word used.

Common Sense Law III: Everything takes longer than you think.

Common Sense Law IV: Deadlines are always closer than you thought.

Read more
Setting Up a Workshop

Setting Up a Workshop

Recently on Facebook, I saw someone asking about the floor in her workshop she was setting up. Her husband wanted to put down carpet since the workshop was in the cellar and the carpet would make the floors feel warmer. Of course, she got an emphatic, “no” because of burns and glass shards. Stained Glass News puts out a publication called “The Beginner’s Guide to Stained Glass.” In that publication, there is an article called “Helpful Ideas for Setting up your Own Stained Glass Workshop.” Most of this info comes from that article.
  1. Proper ventilation. That can be a ventilation system or a fan blowing the fumes away from you or a fume trap. A good option would be the Weller Fume Trap Smoke Absorber.
Weller Fume Trap Smoke Absorber.2. Plenty of light. When we set up our first retail store, at one point, we doubled the lighting. We just could not get enough light. Make sure you have a well-lit work area. Light boxes are also very handy. 3. Storage for glass. There are plenty of options available for easy glass storage. If you buy full sheets, ask your glass dealer for empty cases. Set them on end, and you have a great storage area. The Morton glass caddy is great for cut sheets. Morton Glass Caddy.4. Grounded electrical connections. Do not use extension cords. The power strips that extend horizontally or vertically work well. Buy more than you would expect to use because you just won't believe how many you will actually need. You'll need power for your soldering iron, ventilation, your music source, saw, grinder and lightbox, just for starters. Have them in easy reach, not under a counter so you won't have to crawl around to plug something in. 5. Disposal of glass and junk. Set up your room with a place to put the glass you want to keep. As a safety precaution, use a metal trash can for glass shards or working with hot glass. Cleaning rags should go in covered metal storage containers. Clear storage bins are a great way to store your scrap glass.6. Easy-to-clean flooring. Do not use carpet. Make sure your flooring is something that is not going to break your heart if you drop hot solder on it and burn it. 7. Pay attention to the height of your work area. Do you like to work sitting or standing? Have your working surface at a comfortable height based on this preference. 8. Access to water is important. Using your kitchen sink is not recommended for this activity.
Read more
26 results