$20 Flat Rate Shipping to Contiguous U.S.
Currency

That's Pretty Shifty!

Shifty and CFL are two terms to describe the same thing — a pallet of glass that changes color based on the light that it is under. CFL stands for “compact fluorescent light.” The glass changes its apparent color in fluorescent lighting. The first CFL/shifty glass was done by Glass Alchemy in 2014, with the color Serum. Next, came Terps.
Serum by Glass Alchemy
Terps by Glass Alchemy
These are a bit tough to get, but other CFLs are available:
Potion by Glass Alchemy
Gemini by Northstar
Hydra by Northstar
Siriusly by Northstar

Check our hot glass section for availability.

Read more

Y96 Firing Schedule Guidelines

Please adjust hold times for the size of your project.

Remember, this is only a guide.

Full Fuse
  • From room temp to 1,000F at 300 degrees per hour, hold 10 minutes
  • From 1,000F to 1,250F at 300 degrees per hour, hold 20 minutes
  • From 1,250F to 1,425F at 300 degrees per hour, hold 15 minutes
  • Crash from 1,425F to 950F, hold 60 minutes
  • From 950F to 800F at 200 degrees per hour, hold 10 minutes
  • From 800F to 150F at 300 degrees per hour
  • Natural cooling to room temperature
Tack Fuse
  • From room temp to 1,000F at 300 degrees per hour, hold 10 minutes
  • From 1,000F to 1,250F at 300 degrees per hour, hold 20 minutes
  • From 1,250F to 1,350F at 300 degrees per hour, hold 10 minutes
  • From 1,350F to 950F AFAP, hold for 60 mins
  • From 950F to 800F at 200 degrees per hour, hold 10 minutes
  • From 800F to 150F at 300 degrees per hour
  • Natural cooling to room temperature
Slump Fuse
  • From room temp to 1,000F at 300 degrees per hour, hold 30 minutes
  • From 1,000F to 1,225F at 200 degrees per hour, hold 10 minutes
  • From 1,225F to 950F fairly quickly, hold for 60 mins
  • From 950F to 800F at 200 degrees per hour, hold 30 minutes
  • From 800F to 150F at 300 degrees per hour
  • Natural cooling to room temperature

REQUIRES EYE CONTACT.

REMEMBER, THIS IS ONLY A GUIDE.

Read more

Wissmach Luminescent Glass

Luminescent glass is different than iridescent glass. It is low-fire—not high-fire like iridescent—and is intended for reverse fusing.

What is reverse fusing? Reverse fusing means placing your piece facedown on the kiln shelf and building backwards, fire-coated side down. If you are firing on a textured mold, place a piece of ThinFire between your boron-treated mold and the glass. If you fire your piece with the coated side up or cover it with another piece of glass, you will lose the coating. If you are slumping and do not go over 1,200 degrees, you can place the luminescent side up and not lose the coating. Luminescent glass is food-safe and has been tested by the U.S. Food and Drug Administration. However, please note that once the piece has been fired in your kiln, it is no longer a Wissmach product; it is your product. If you have been firing glass that could leave lead or cadmium traces in your kiln, that could get on the product, which would render it unsafe for serving food or beverages.
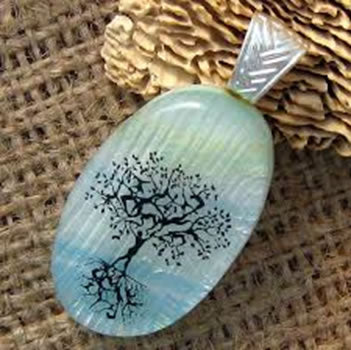
 LEFT: Luminescent glass fired with ThinFire in between, with the coating facedown. RIGHT: Luminescent glass fired facedown, directly on the mold.

Firing Schedules: Courtesy of Petra Kaiser and Wissmach Glass

Standard Fusing Schedule – 2 Layers Thick

Segment 1: 600°F/hr up to 1,000°F, hold for 10 minutes

Segment 2: Full/9,999 up to 1,410°F, hold for 10 minutes

Segment 3: Full/9,999 down to 950°F, hold for 60 minutes

Segment 4: 100°F down to 700°F, hold for 1 minute

Tack Fuse, Polishing and/or Slumping into a Mold

Segment 1: 300°F/hr up to 1,000°F, hold for 10 minutes

Segment 2: Full/9,999 up to 1,300°F or 1,350°F (depending on your desired results), hold for 10 minutes

Segment 3: Full/9,999 down to 950°F, hold for 60 minutes

Segment 4: 100°F down to 700°F, hold for 1 minute

Draping over a Mold and/or Polishing

Segment 1: 300°F/hr up to 1,000°F, hold for 10 minutes Segment 2: Full/9,999 up to 1,200°F or 1,220°F (depending on your desired results), hold for 10 minutes Segment 3: Full/9,999 down to 950°F, hold for 60 minutes Segment 4: 100°F down to 700°F, hold for 1 minute

NOTE: Not all kilns are alike. Your kiln size, controller type and individual project may require some alteration to the schedule for best results.

Read more

Mind the Gap!

How close should your glass pieces be? They should be close enough so that you are comfortable with how heavy a solder line you will end up with. To help prevent uneven spaces, here are some hints:
  • Use push pins or jigs to hold your glass in place while building and checking the fit. That way, you won’t get one piece fitting perfectly as you are pushing another one out.
  • Make sure you have not flipped any glass over. Label your pieces to avoid this.
Before you say “good enough,” think about any holes or uneven spaces you are filling with solder. When your piece is held up to the light, those places will not let light through. They will become part of the design. Another problem is overheating the glass due to reworking it with a hot soldering iron. You don’t want to crack your glass with thermal shock because you are adding so much solder to fill the gap. Often when you are doing this, one side looks good and then you turn the piece over and there is a gob of solder. So you fuss with that, going back and forth, heating and heating, and then you hear the dreaded tink—the sound of glass cracking and your heart breaking! The best fix—sorry to say—is to recut. Be patient with yourself. This is a skill—so practice and don’t give up. Photo courtesy of Inland.
Read more

STAINLESS STEEL MOLD PREP

This was fun! A customer came in with a stainless bowl that she had slump a thick piece of glass over. It stuck! She broke the ruined bowl off, but a very thin layer of glass remained on the mold. That prompted a discussion on how to get the rest of the glass off the mold and why it stuck anyway. First to get it off. She was first going to try fusing it off and if that did not work, she was going to sandblast the stainless. One or the other should work. Then she said she posted a picture of it on a facebook fusing group and prompted a discussion about prep of the stainless. Here is the surprise! Some people do not prep it AT ALL! I went to Facebooks Fusing 101: Any and Everything you Wanted to Know But Where Afraid to Ask. I said “Recently I heard that some people do not kiln wash stainless molds. I would be interested to hear what people think of this.” There were some differences of opinion to be sure..
  • Cover with fiber paper or ZYP
  • Spray with Boron Nitride (ZYP)
  • If you use ZYP you rarely have to do it again
  • I don’t use anything on stainless steel. As long as the glass is NOT an opal glass in contact with stainless steel and it is good quality, it is fine. You get a real shiny finish on the surface in contact with the stainless steel.
  • It is minimal work to use a barrier. I would rather be sure instead of concerned.
My own fusing teacher was emphatic about using something. She suggested Slide because it is cheaper than most boron nitride products and it is easier than kiln washing. https://www.stainedglassexpress.com/boron-nitride-hi-temp-spray-coating.html?category_id=571 More inexpensive, but more labor, is to use kiln wash. The problem is that it slides off the mold easily. Here is the trick. Wash the mold with alcohol and then heat it in your kiln to 1200 degrees F for about ½ hour. Cool it. Then heat again to just under 500 degrees F and brush or spray on the wash in thin even coats. Allow the coating to dry completely between each application. Coat it until covered. After the first time this is done (and it does last a long time) we will just coat it put it on top of a hot kiln. Seems to work fine.
Read more

Foils.. why so many?

We often see people just standing in front of our foil display looking overwhelmed! Here is a picture of our display just so you can see how overwhelming it is! As you can see, we have three different brands in our store. We just recently switched from Venture Tape to Edco. Venture has been sold twice in the last couple of years and seems to struggle with the consistent great product quality we have always had. We are hoping we will have better luck with Edco. We still have some Venture because Edco did not have a few we wanted. We also stock one Studio Pro in 7/32 black back because it is a good value and we have had good feedback. They do not have a wide variety so that is the only one we have from them. To explain the variety: First is width. We were thrilled that Edco comes as wide as ½”. That is great for people who are putting two pieces of glass together. Other sizes: 5/32, 7/32, 5/16, 3/16, ¼. If you want a very thin solder line you use thinner foil. If you need strength or you like a heavier line, use wider foil. Next is thickness. It is measured in millimeters. It is how thick the foil is. It might be as thin as 1 mil go to 1.25 of 1.5. Venture shows this on the label and by the color of the core the foil is wrapped on. Next is the backing. There is copper, black and silver. This is important depending on the transparency of the glass and if you are using patina. Let’s say you are making a piece in all clear glass and you plan to not patina it. You should use silver backed foil so the solder line is silver looking on the exterior and because you can see into the glass, it will look silver on the inside. If you use copper, it just jumps out and ruins the piece. If you were using clear and going to patina it black, use black backed. If you are going to patina it copper, use can use the regular copper foil that is copper on the outside and the sticky side. There is also a foil that is called silvered. It is silver on the outside and the inside. Often used when doing suncatchers and eliminates the need to solder the outer edge. Then there is new wave which has a scalloped edge. Decorative. Also sheets of copper so that you can cut for overlays or have it wide. It also has a sticky side. Use this link to see our full line of foils. https://www.stainedglassexpress.com/metals/copper_-_silver_foil/
Read more

LITTLE HANGERS

When doing jewelry or small pieces there are several ways to hang. What you don’t want to do is ruin the looks! One of the cleanest looks is a jewelry bail which is glued on when the piece is out of the kiln. Available in different sizes, shapes and finishes.

https://www.stainedglassexpress.com/?target=search&mode=search&substring=bails&including=all

There is also a form of a bail that has prongs to go into a hole that you have prepared in your glass. You do this by drilling the hole after the glass comes out of the kiln.

https://www.stainedglassexpress.com/sterling-silver-leaf-prong-pendant-bail.html

Another option is high temp wire. This can go right into the kiln. Put it between two pieces of glass so it fuses and becomes part of the piece. This is available by the roll or in little preformed hangers. This does not stay shiny silver when it is fused. It darkens.

https://www.stainedglassexpress.com/?target=search&mode=search&substring=3210&including=all

https://www.stainedglassexpress.com/high-temp-wire-24-gauge-10-ft.html

Handy Hangers are made of brass, so they can go into the kiln. Put them between two pieces of glass. The same folks who manufacturer handy hangers just came out with the Finley hanger which is more delicate than the handy hanger.

https://www.stainedglassexpress.com/finley-fusible-hangers.html

https://www.stainedglassexpress.com/?target=search&mode=search&substring=207158&including=all

The other option which is a different great look is to put fiber paper as a spacer. Fiber paper comes in different thicknesses or you can stack it.

https://www.stainedglassexpress.com/Fiber-Paper-1-8-in.html

Read more

The Beginner’s Torch Trap: A Lampworking Torch Buyer’s Guide Part 1

Thank you to Bethlehem Burners for this Blog! If you landed here, you must be interested in buying your first lampworking torch! It’s an exciting time and you’ll want to feel confident in your purchase. In part one of our Lampworking Torch Buyer’s Guide, we’ll address concerns about buying a less expensive torch versus a more top of the line torch for beginner skills. They say: “Your first lampworking torch should be cheap and something you can destroy while learning.” Bethlehem Burner’s says: While this advice definitely has merit, a beginning lampworker should also keep in mind what type of torch they hope to use once they move past their “beginner’s torch.” For example, there are different style torches that produce different style flames. These different style flames affect the way glass reacts in the flame, which in turn affects the way the glass should be manipulated in the flame to produce the desired effect. Modern lampworking, using both soft and borosilicate glass, involves the use of a lot of color. Fuel mixture ratios and flame velocity affect the chemical composition of each glass color differently. This means flames produced by one torch will affect a glass color differently than the flames of another torch. If a lampworker learns to lampwork on one style of torch, they will need to adapt a lot of their glass techniques when they switch to a new torch style. This transition can be very difficult, time-consuming, and expensive. In order to make this transition as smooth as possible, it is best to choose a new torch that produces flames similar to the flames produced by the torch they learned on. So, while, “your first torch should be cheap and something you can destroy while learning,” isn’t necessarily wrong, it isn’t your only option. Kate Hayes, VP and resident torch expert at Bethlehem Burners weighs in on the topic: “Get a smaller version of your dream torch. Choose your first center fire style wisely, because the transition from premix center fire to surface mix center fire is the hardest and most expensive transition to make,” suggests Hayes. Stained Glass Express is a proud distributor for Bethlehem Burners. Click here to see the burners we have in stock. https://www.stainedglassexpress.com/flameworking_glassblowing/annealers-bench-burners-accessories/ We are always happen to order in other Bethlehem products for you.
Read more

EGGBEATER JESUS GLASS FALLING

This week I was waiting on customer who wants to do mosaic something that will be outside. When she asked for the correct products, I could not help but think of this situation that was written about in the Fall and Winter 2017 issues Stained Glass magazine. (Info comes from there and an article in Alabama Living.) All I could think of was “make sure it is weather proof!" This amazing piece of art is located at the Huntsville, Alabama First Baptist Church. It took seven years to complete (1966 to 1973) and contained approximately 1.4 millions pieces of Italian tile – none larger than a thumbnail. This mosaic is giant! There are seven bays and each bay is 18’x45’. It is about 5,600 sq ft of mosaic. It made the news because it was falling apart! A team went in to asses the issues. They determined the problems were: Glass tiles were used instead of smalti, (Smalti are ½-1/3 the size of tiles but twice as thick. Smalti do have a beveled edge) the mounting of the tiles to a netting with epoxy was not the best method, the materials used were of dubious quality, the cements used to install the mosaic were not the best choice, and the methods used to apply the cement and mosaic sections were suspect and probably incorrect. Within a year of the installation glass started to fall! 50 years later the team was trying to determine the best way to fix it. The decision was made to remove the entire mosaic and replace it with new. The design was to be reproduced and this time fabricated and installed correctly! The color palette was to remain the same, but it was allow to increased the depth of color and make some minor corrections to the design. This project is still going on. At the time of the Winter issue of Stained Glass bay two was complete and Bay 3 was underway, schedule to be complete by Easter.
Read more

WHICH SIDE IS THE COATED SIDE OF DICHROIC

Some Info from The Frog Blog Dichroic glass is so beautiful and there are so many uses, it is just delightful. However, there are a few problems that knowledge can help deal with. One is that it is impossible to tell 96 from 90 COE if you get them mixed up. The answer to this one is—DON’T mix them up. Keep them labeled. If you keep scrap, keep it in a well-marked box. It is often important to know which side the dichroic coated side is to get the look you are going for. If it has a dark base, no problem—you can see it. However, on a transparent base, it can look the same on both sides! Reasons you may want to know this? Cutting. Always cut on the non-coated side of the glass. It will help prevent chipping, especially on textured glass. It also saves your cutter. Coated Side Down. When using the coated side down or capped with clear glass, the dichroic glass will have a smooth glossy surface and sparkle like glitter. It will also change colors between the transmitted color and a completely different reflective color, depending of the angle of view. Coated Side Up. If you use the dichroic glass with the coated side up or uncapped, the dichroic surface will have a highly metallic sheen. The piece may additional be rough and textured depending on the type of dichroic glass you are using. This is what to do. Place the glass over a dark background. Look at the glass at an angle so that you are seeing the reflection of the dichroic. Touch the surface with a paperclip (don’t scratch it). The paperclip will reflect. To know your answer. Does the reflection meet the paper clip, or there a gap between the clip and its reflection?
Read more

HOW TO BUY A KILN

BUYING A KILN It is a big decision. It is a lot of money. It is a big piece of equipment that will take up space. There really is a lot to consider.
  • How much space do you have
  • Do you want to go to the expense of 220 line or get by with what you already have?
  • Size of the kiln
  • Programming
We sell Olympic Kilns at Stained Glass Express. www.greatkilns.com. We love their support and we love the kilns. Basically, you have a box made of firebrick that is attached to a controller. So the support piece is BIG. For your workspace you should be prepared to make it a fire proof space. Easily done. Flame resistant sheetrock or metal set away from the wall. Put it on something that won’t burn. Common sense kind of stuff. Don’t burn your house down. The big difference between having a 110 line and a 220 is the depth of the kiln. When there are two elements in the kiln you can run it on a 110 line. You just have to change the outlet to accommodate the commercial plug. Consider what you want to make. Jewelry and little dishes. You are good with a little kiln. If you think BIG, you will need a bigger kiln. Maybe one with a clamshell feature so that it opens from the top and the bottom. You can get one that bottom slides out. Features to consider when thinking about putting things in the kiln and getting them back out. If you want to do tall things like a drape lamp shade or vase you should consider bringing in that 220 line. The 220 allows the kiln to have three elements and therefore it can be deeper. Everyone I know, recommends upgrading to a digital controller. One where you can save multiple programs. We sell the RTC-1000 with great results. We can store 6 programs which pretty much covers everything. What you definitely do not want is one that you have to babysit and make sure it gets turned off. You run around with a timer around your neck (seriously) and I have heard terrible results of kilns burning through when someone went to bed and forgot. One more thing to put into your brain. If you think you ever might get into glass blowing or bead making you might consider a kiln with a punty door that you can use to anneal your beads. To see what Stained Glass Express offers https://www.stainedglassexpress.com/fusing_supplies/kilns-and-accessories/
Read more

Tips From the Glass Academy: DECALS—TIPS AND TRICKS For applying to Dichroic Glass

NovemberDECALApplication 1. Clean glass is a must! Use ammonia or alcohol if needed. Avoid touching glass surface with your hands. 2. Remove the wax paper barrier before soaking. 3. With a good pair of small scissors trim about 1/16 inch away from the decal card 4. Curved-tip tweezers are very handy. 5. Wet the surface of the glass when applying the decal, it allows the decal to easily move into position. 6. To apply the decal, slide it slightly off of the paper and hold the paper edge with the tweezers. Position decal and hold exposed edge with finger, or a second pair of tweezers, on the glass while pulling paper from underneath. When the decal is in place hold with finder and blot excess water. Continue to gently blot, using an inside out rolling motion, until all the water and bubbles are out from underneath the decal, a small squeegee (credit card) is useful. Continue until the entire decal, including the edges, are firmly affixed to the clean glass surface. 7. Allow to dry completely before firing. The smallest amount of moisture can stream aprt the decal from the glass. Firing Conditions 1. Over-firing is disappointment. Decal are temperature sensitive, some colors more than others. The best results are achieved with the lower temperatures and slightly longer soak times. 2. Good ventilation in the kiln during the burn off phase, (500-900f), is important for all decals and critical for hi-ire and low-fire ) accents) metallic decals. Leave the lid vented till the kiln reaches 1100f. Info from Profusion Studio.
Read more
51 results